Common Passport Photo Mistakes and How to Avoid Them
Avoid common passport photo rejections: correct size, background, lighting, neutral expression, and no glasses.
Common Passport Photo Mistakes and How to Avoid Them
Getting your passport photo rejected can delay your travel plans by weeks. The U.S. Department of State has strict photo requirements, and small mistakes like incorrect size, poor lighting, or wearing glasses can lead to rejection. Here’s what you need to know:
- Size Matters: Photos must be 2 x 2 inches with specific head proportions.
- Background: Use a plain white or off-white background, free of shadows or patterns.
- Lighting: Ensure even lighting across your face; avoid shadows.
- Expression: Maintain a neutral expression with both eyes open.
- No Glasses or Accessories: Glasses, hats, or headphones are not allowed unless for medical or religious reasons.
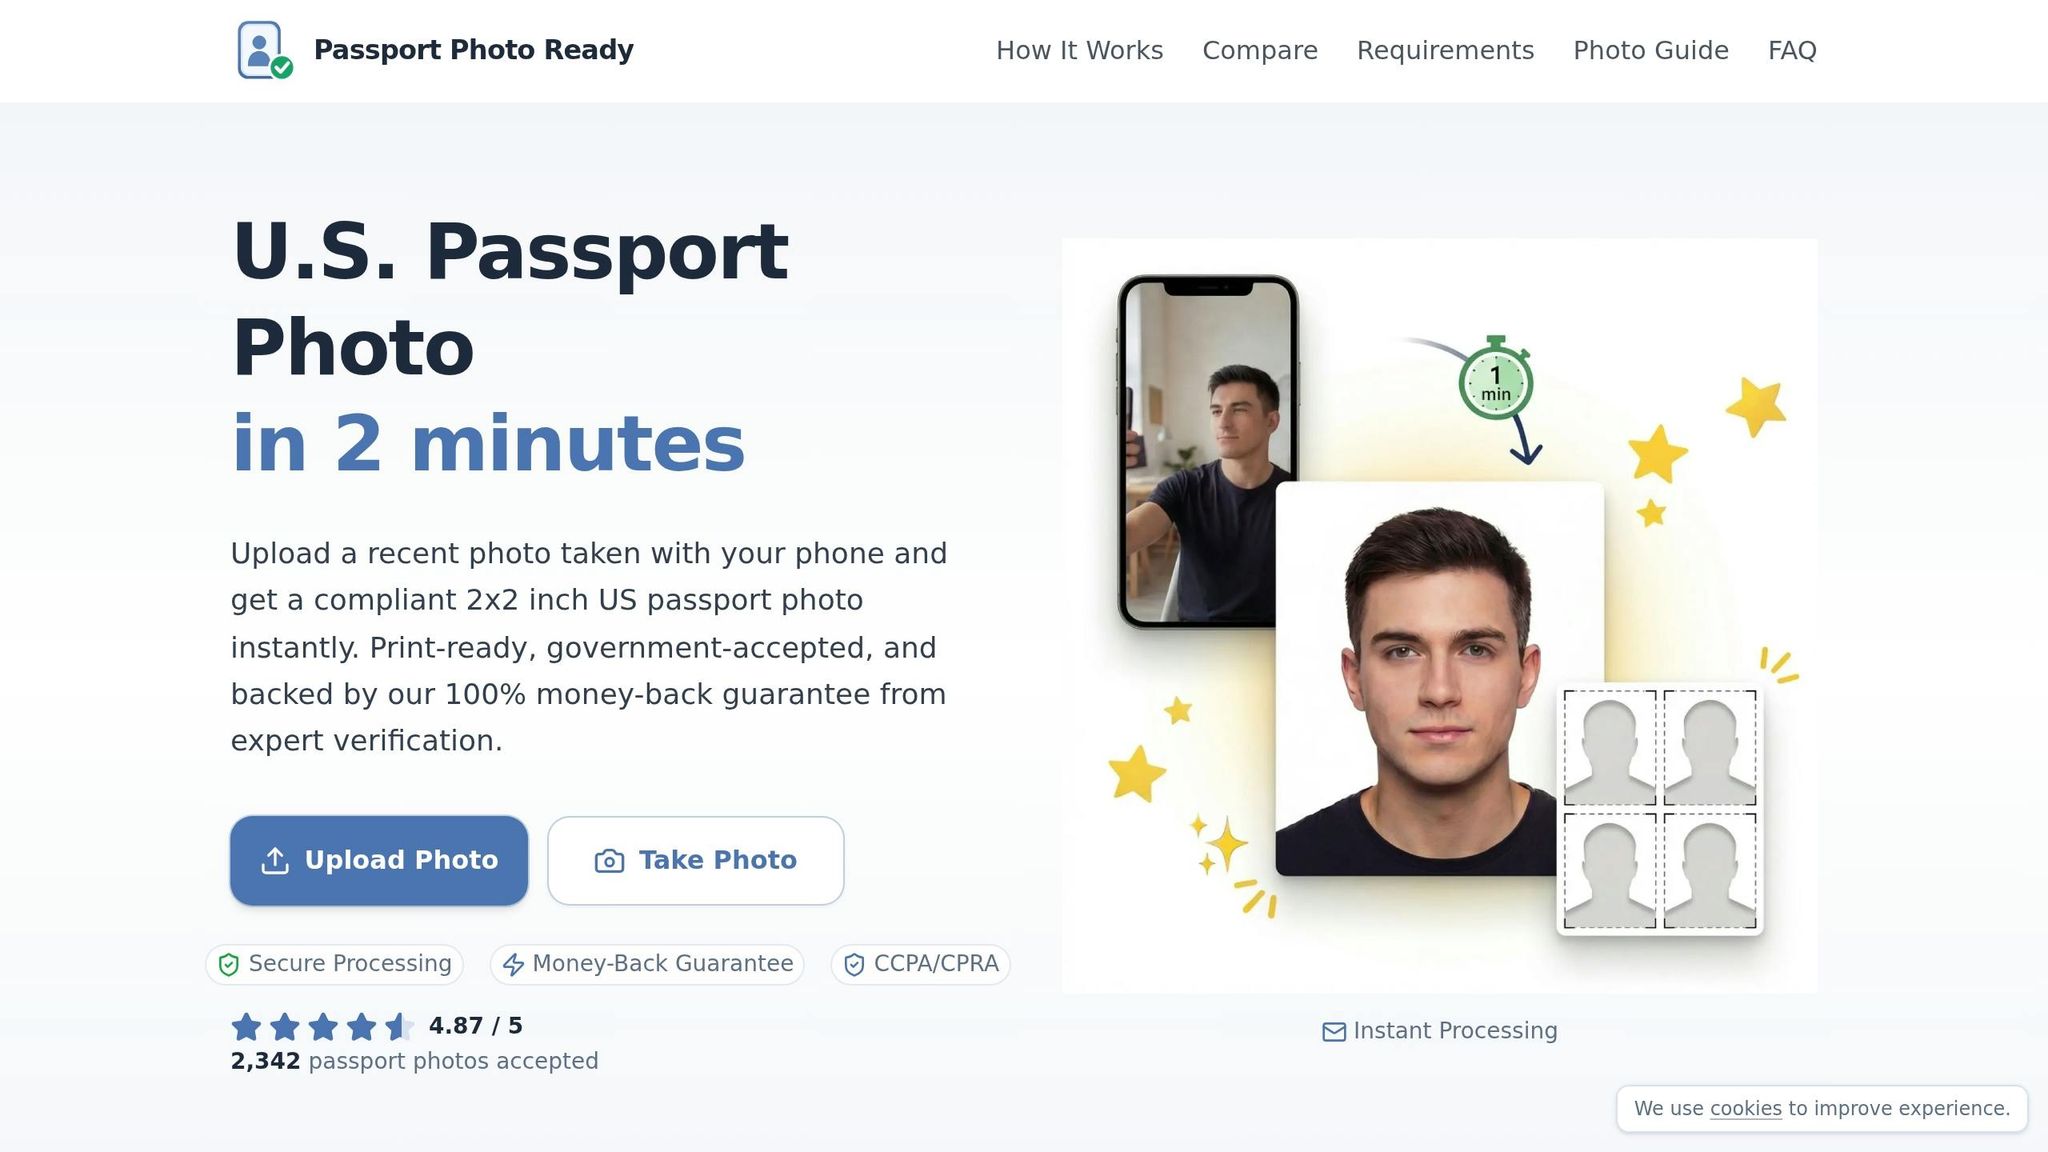
To avoid issues, follow the guidelines carefully or use a passport photo maker like Passport Photo Ready, which ensures compliance for $8.99 with expert verification and a money-back guarantee if rejected. This saves time and ensures your photo meets all standards.
Top 5 Passport Photo Mistakes That Cause Rejection
10 Passport Photo Mistakes That Will Get You Rejected (And How to Fix Them) #passportphoto
sbb-itb-84f4ca2
Common Passport Photo Mistakes That Cause Rejection
Avoiding passport photo errors can save you from frustrating delays. The U.S. Department of State has strict guidelines, and even minor mistakes can lead to rejection. Below are the most frequent issues and how to steer clear of them.
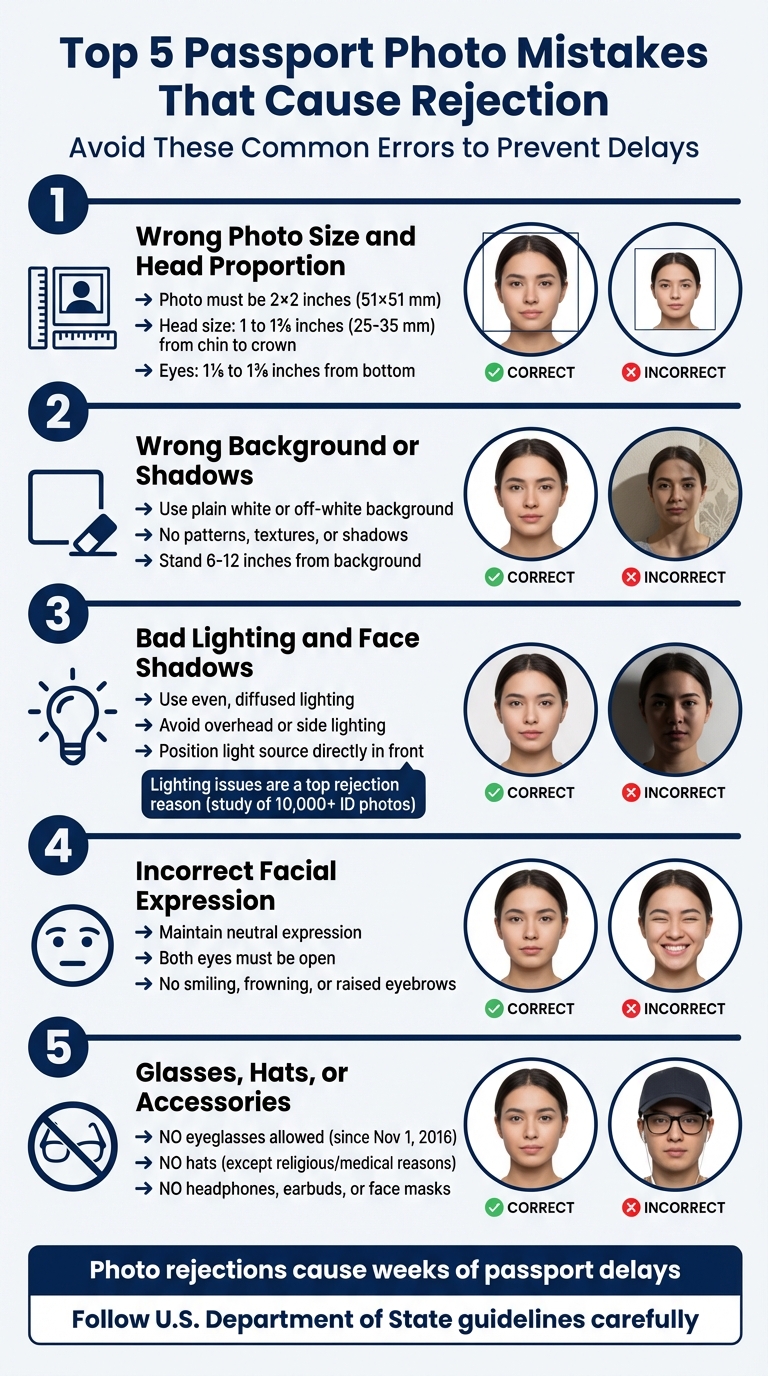
Wrong Photo Size and Head Proportion
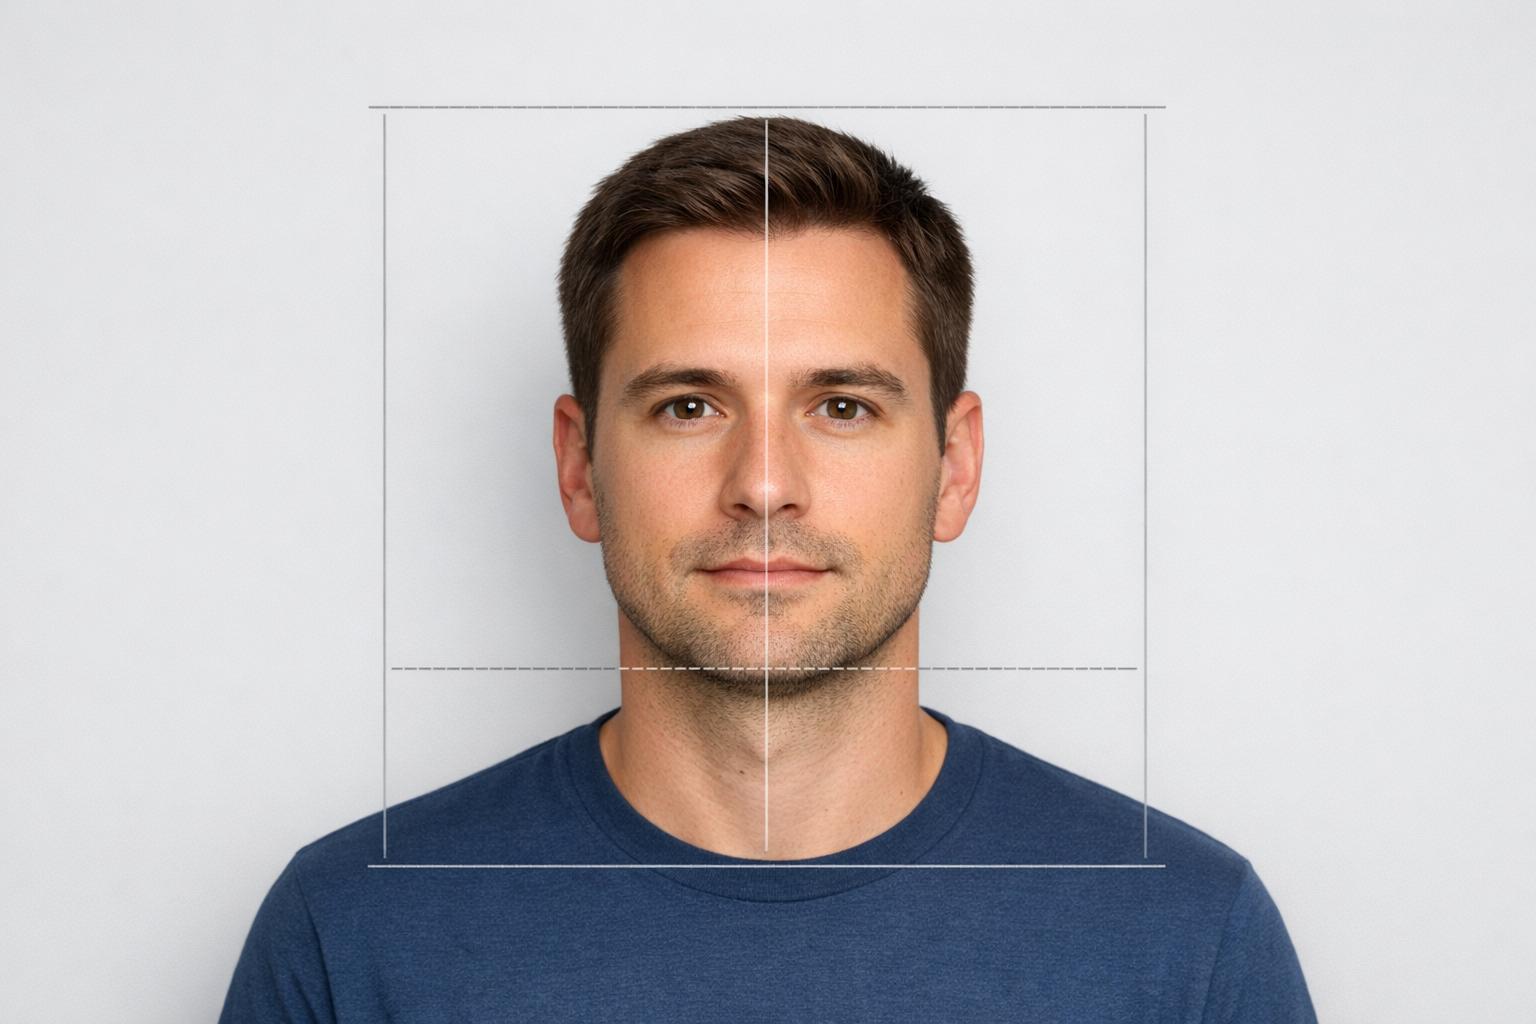
Passport photos must be 2 x 2 inches (51 x 51 mm) with a square aspect ratio. The head should measure between 1 inch and 1 3/8 inches (25–35 mm) from the bottom of the chin to the top of the head, and your eyes need to fall between 1 1/8 inches and 1 3/8 inches from the bottom of the photo.
These precise measurements are essential for biometric systems to process the photo correctly. If the size or proportions are off, the photo might be rejected during the application process or flagged at airport checkpoints.
Common errors include incorrect camera distance, which can distort proportions, or cropping that cuts off parts of the head. To avoid these pitfalls, ensure the camera is at eye level and at least 4 feet away. A proper, consistent background also plays a big role in approval.
Wrong Background Color or Shadows
The background must be plain white or off-white, free of any patterns, textures, or shadows. Shadows cast by your head or body can result in rejection. To get it right, use even lighting and check the image carefully before submission.
Bad Lighting and Face Shadows
Lighting is a key factor in passport photo acceptance. The U.S. Department of State requires even lighting across your face to ensure all features are visible and skin tones are accurate. A study of over 10,000 ID photos found that lighting issues, including shadows, are among the top reasons for rejection.
The Department of State warns:
"Overhead or side lighting that casts shadows can obscure facial features or cause overexposure, leading to rejection."
Mistakes like overhead lighting that creates shadows under the nose or chin, or side lighting that causes uneven shadows, are common. Shadows from hair or head coverings can also lead to rejection. To avoid these problems, position your light source directly in front of you. For babies, lay them on a plain white sheet and ensure the lighting is even, avoiding shadows on their face. Also, keep bangs or hair from covering the eyes or forehead.
Smiling, Frowning, or Closed Eyes
A neutral facial expression with both eyes open is required. Smiling, frowning, or raising your eyebrows can alter facial measurements, causing rejection. Closed eyes are another common issue, though there’s some leniency for infants whose eyes may not be fully open.
Glasses, Hats, or Uniforms in Photos
Since November 1, 2016, eyeglasses - including prescription glasses, sunglasses, and tinted lenses - are not allowed in U.S. passport photos. The Department of State clearly states:
"Remove all eyeglasses and tinted lenses."
Exceptions are made only for medical reasons, requiring a signed note from a doctor. Hats and head coverings are also prohibited unless worn for religious or medical purposes. If permitted, they must be a solid color without patterns and should not cast shadows or obscure facial features.
Additionally, headphones, wireless earbuds, and face masks are not allowed because they obscure facial features. Jewelry and piercings are acceptable as long as they don’t block any part of your face. With careful preparation, these mistakes can be easily avoided.
How to Avoid These Passport Photo Mistakes
Use the Right Equipment and Setup
When taking a passport photo, use your smartphone's rear camera instead of the selfie camera. The rear camera typically offers better resolution and avoids barrel distortion, which can alter how your face appears. If you're taking the photo yourself, set the camera on a stable surface or use a tripod, and take advantage of the self-timer feature. Position the camera at eye level, about 4 to 5 feet away from you, to maintain proper proportions. Turn on grid lines to help center your face in the frame, and make sure to turn off beauty filters, portrait modes, or any automatic enhancements. As the U.S. Department of State advises:
"Do not change your photo using computer software, phone apps or filters, or artificial intelligence."
Once your equipment is ready, it's time to set up the background and lighting for the best results.
Set Up the Correct Background and Lighting
A compliant background and proper lighting are key to an acceptable passport photo. If you have a plain white wall, that works perfectly. If not, hang a white bedsheet and pull it tight to avoid wrinkles or textures. Stand 6 to 12 inches away from the background to reduce the chance of casting shadows. For lighting, natural diffused daylight from a large window is ideal. If natural light isn't available, use two lamps with white LED bulbs positioned at 45-degree angles to your face. This setup minimizes shadows and keeps skin tones neutral. Avoid using a flash, as it can create red-eye or wash out your features.
Review Photo Guidelines Before Submitting
Before submitting your photo, double-check that it meets all official requirements. The photo should measure 2 x 2 inches (51 x 51 mm) and must have been taken within the last six months. Print it on matte or glossy photo-quality paper, ensuring your head size measures between 1 and 1 3⁄8 inches (25–35 mm) from chin to the top of your head. The image must be sharp, high-resolution, and feature a pure white background free of shadows, textures, or objects. For digital submissions, use a JPG, PNG, HEIC, or HEIF file format, with a file size between 54 KB and 10 MB. Additionally, the U.S. Department of State offers an online photo tool to help you crop, reposition, and check for basic compliance during the application process.
Get Expert Verification
Ultimately, a Department of State employee will review and approve your photo. To avoid delays or rejections, consider using services like Passport Photo Ready. These services provide expert verification to ensure your photo meets all official guidelines before submission.
Why Use Passport Photo Ready for Compliant Photos
Features and Benefits of Passport Photo Ready
Passport Photo Ready combines advanced technology with expert oversight to make sure your passport photo meets every official requirement. The service automatically adjusts your photo to the required 2 x 2-inch size and ensures your head is properly sized between 1 and 1 3/8 inches from chin to crown. Using sophisticated algorithms, it fine-tunes the background, lighting, and proportions of your image. Afterward, a compliance expert reviews the photo to confirm it adheres to all U.S. Department of State standards.
The service includes a 100% acceptance guarantee. If your photo is rejected by the government, you'll receive up to double your money back. For just $8.99, you can avoid unnecessary delays. Plus, your privacy is protected - photos are encrypted and deleted within 72 hours. You'll receive a digital 2 x 2-inch image file and a 4 x 6-inch printable sheet, with the option to pick up prints at Walgreens.
This efficient system simplifies the process, as shown in the easy 3-step method below.
How to Get a Compliant Photo in 3 Steps
You can create a fully compliant passport photo in just 3 minutes using your smartphone. Here's how it works:
- Step 1: Upload an existing photo or take a new one with your phone’s camera.
- Step 2: The service automatically processes your photo to adjust the background, size, and head placement.
- Step 3: Download your verified digital photo to print at home or pick up at Walgreens.
This straightforward process lets you take your passport photo at home, sparing you a trip to a photo studio while ensuring your submission is accepted on the first try.
DIY vs. Professional Online Services
Let’s dive into the differences between taking passport photos yourself and using a U.S. passport photo online service. While DIY methods might seem appealing at first, they come with a host of challenges that can lead to rejection.
One of the biggest hurdles with DIY photos is lighting. Uneven lighting can create shadows on your face or background. Even standing too close to a wall can cast unwanted shadows that make your photo non-compliant.
Another common issue is head proportions. The U.S. Department of State has strict guidelines, such as the chin-to-crown measurement needing to fall between 1 and 1 3/8 inches. DIY photos often fail here because of mistakes in positioning or distance from the camera. As the Department of State puts it:
Photos that are taken too close or too far away will be rejected.
Then there’s the challenge of maintaining a neutral expression and ensuring your head is properly aligned. Without immediate feedback, this can be tricky.
Technical errors are another pitfall. Using low-resolution settings, relying on digital zoom, or printing on regular paper instead of photo-quality paper can all lead to rejection. Even minor details, like a slightly off-white background or a wrinkled bedsheet used as a backdrop, can cause problems. And remember - digital edits to fix these issues are strictly prohibited.
Here’s a quick look at how DIY compares to Passport Photo Ready:
Comparison: DIY vs. Passport Photo Ready
| Feature | DIY Method | Passport Photo Ready |
|---|---|---|
| Background Adjustment | Manual setup risks shadows and textures | Automatic removal and compliant white background |
| Photo Size Compliance | Manual cropping; prone to errors | Guaranteed compliance with 2 x 2-inch size |
| Expert Verification | No professional review | Every photo verified by experts |
| Processing Time | 25–35 minutes (including setup) | 2–3 minutes for full processing |
| Cost | Printing costs only | Starts at $8.99 for digital and printable files |
| Money-Back Guarantee | No protection against rejection | Refund guaranteed if rejected |
With professional services, you get a 98–99% acceptance rate, compared to the much higher rejection risk of DIY photos. For just $8.99, Passport Photo Ready offers automated adjustments, expert reviews, and the assurance that your photo meets all requirements. It’s a small price to pay for avoiding delays and the hassle of rejections.
Conclusion
Getting your passport photo right is straightforward if you stick to the official guidelines. Common mistakes - like incorrect sizing, shadows, wearing glasses, or using an expression other than neutral - can be avoided by carefully following the requirements. Since photo rejections are a major reason for passport application delays, taking a few moments to double-check your photo can save you from long wait times.
Make sure your photo meets the required 2 x 2-inch dimensions with the correct head proportions. Use natural, diffused lighting, maintain a neutral expression, and avoid common pitfalls like low resolution or printing on non-photo paper. Digital alterations are strictly prohibited by the U.S. Department of State:
Do not change your photo using computer software, phone apps or filters, or artificial intelligence.
While taking your own U.S. passport photo might seem like a money-saver, it can lead to errors in lighting, proportions, or background color. To avoid these risks, Passport Photo Ready offers a hassle-free solution for just $8.99. Their service ensures your photo meets all requirements with features like automatic background adjustment, precise 2 x 2-inch sizing, and expert verification. You'll get a digital file along with a printable 4 x 6-inch sheet, and even have the option for Walgreens pickup. Plus, they back their service with a money-back guarantee if your photo is rejected - so you can apply for your passport with confidence.
FAQs
How can I tell if my head size is within the required range?
To make sure your passport photo meets the required standards, your face should take up 50–69% of the photo's height, which translates to 1 to 1 3/8 inches from your chin to the top of your head. The photo itself should be printed at 2x2 inches, and you can use a ruler to measure and verify this distance. Getting these proportions right is key to ensuring your photo aligns with official guidelines.
What’s the easiest way to avoid background and face shadows at home?
To avoid shadows when taking a passport photo at home, stand about 2 feet away from a plain white or off-white wall. This helps prevent any background shadows. Make use of soft, natural light by positioning yourself to face a window, and steer clear of overhead lighting or using a flash, as these can cause harsh shadows or glare. Following this setup ensures your photo is evenly lit and complies with official guidelines.
Can I take a passport photo with my phone without breaking the no-editing rules?
Yes, you can take a passport photo with your phone while staying within the no-editing rules, as long as you stick to official guidelines. Choose a well-lit spot with even, natural light and a plain white or off-white background. Avoid altering the image in any way. Keep a neutral expression, ensure both eyes are open, and remove any accessories like glasses or hats. For the best shot, use your phone's rear camera and position it at eye level.