Passport Size by Inches: A Quick Guide for Printing at Home
How to take, resize, and print compliant 2×2-inch U.S. passport photos at home with head-size, background, and print settings.
Passport Size by Inches: A Quick Guide for Printing at Home
Getting your passport photo right is essential to avoid delays in your application. For U.S. passports, the required photo size is 2 x 2 inches, with specific guidelines for head size, background, and photo quality. Printing at home can save you money - under $0.50 per 4x6-inch sheet compared to $8–$20 at professional services. Here's a quick breakdown:
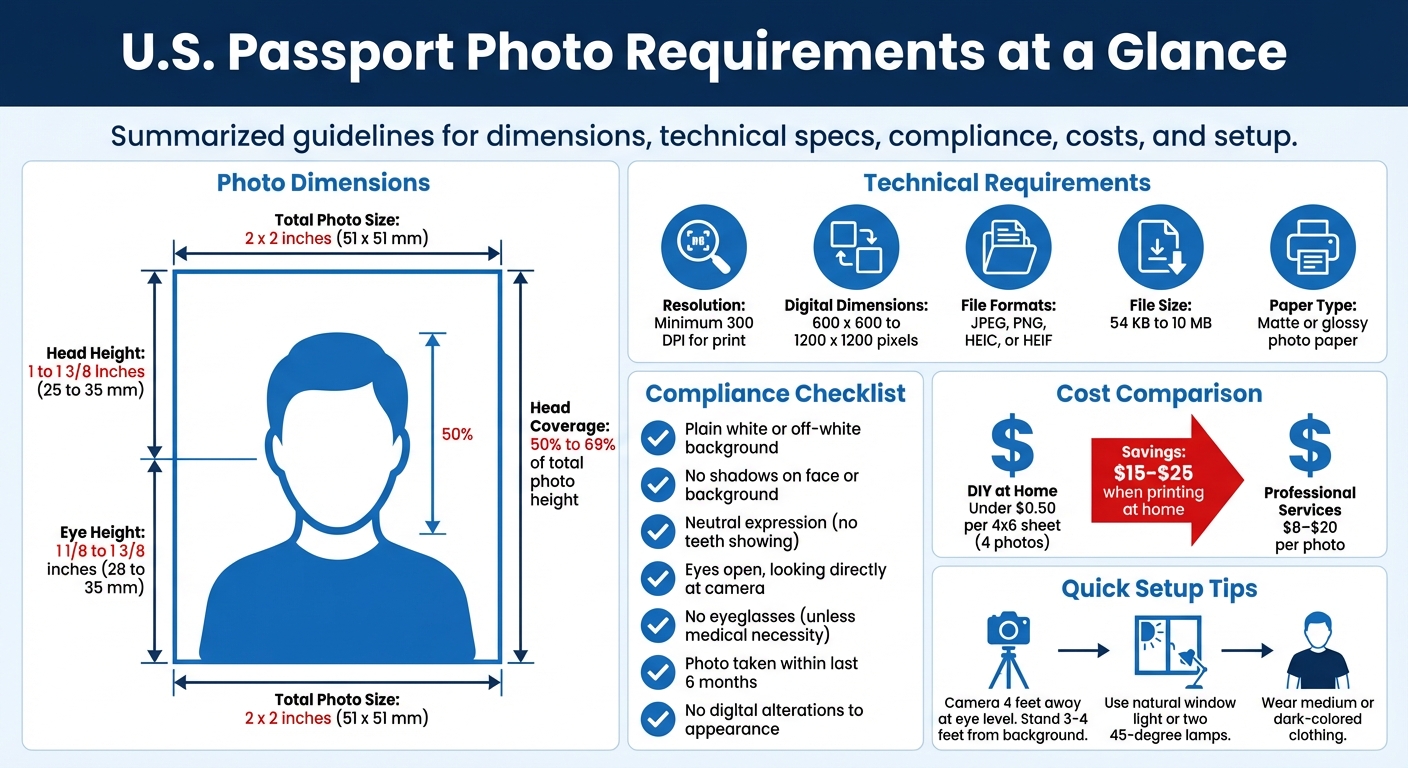
- Photo Size: 2 x 2 inches (51 x 51 mm)
- Head Size: 1–1 3/8 inches (25–35 mm) from chin to crown
- Background: Plain white or off-white, no shadows
- Resolution: At least 300 DPI for sharpness
- Cost Savings: Print four 2x2 photos on a 4x6 sheet for less than $0.50
Follow simple steps: set up a plain white background, take a photo with proper lighting and positioning, resize it to a 2x2 passport photo, and print on photo paper. Double-check measurements and quality to ensure compliance with U.S. passport standards.
U.S. Passport Photo Requirements and Specifications Guide
Print USA Passport photo at home 2x2 - no special tools needed
sbb-itb-84f4ca2
U.S. Passport Photo Size and Compliance Guidelines
When taking and printing passport photos at home, understanding the exact compliance standards is crucial to avoid application delays or rejections.
Standard Passport Photo Size in Inches
For U.S. passports, the photo must measure exactly 2 x 2 inches (51 x 51 mm). Any variation from this size can result in rejection. This precise square format ensures consistent processing by the Department of State.
Additional Compliance Requirements
Meeting the size requirement is just the beginning. Your photo must also adhere to several other specifications:
- Background: Use a plain white or off-white background without shadows, patterns, or textures. Standing about 4 feet from the wall can help achieve this.
- Expression: Maintain a neutral expression or a natural, closed-mouth smile. Photos showing teeth are not accepted. Keep your eyes open and look directly at the camera.
- Eyeglasses: Glasses are prohibited in passport photos unless you provide a signed doctor's statement explaining a medical necessity. This rule has been in effect since November 2016.
- Photo Quality: Print your photo on matte or glossy photo paper with a resolution of at least 300 DPI. For digital submissions, the file must be in JPEG, PNG, HEIC, or HEIF format, with dimensions ranging from 600 x 600 to 1200 x 1200 pixels and a size between 54 KB and 10 MB.
- Recency: Photos must be taken within the last 6 months to ensure they reflect your current appearance.
Additionally, avoid any digital editing that alters your appearance. The image must be sharp and free of blur, grain, or pixelation. Adhering to these guidelines will help ensure your passport photo meets all official standards.
Taking a Passport Photo at Home: Step-by-Step Guide
You can take a passport photo at home with just a smartphone or digital camera. Use the rear camera to avoid any facial distortion. The key is to set up your environment correctly for a clear and compliant shot.
Setting Up Your Photo Environment
Start with a plain white or off-white background. A smooth wall, a wrinkle-free white sheet, or a foam poster board works perfectly, as long as it’s free of textures or objects.
Stand about 3 to 4 feet away from the background to minimize shadows. For lighting, face a large window or use two lamps positioned at 45-degree angles to create soft, even light. Overcast days are ideal because the clouds naturally diffuse sunlight, giving you balanced lighting.
If you’re using artificial lighting, turn off any overhead lights to avoid harsh shadows under your eyes, nose, or chin. Professional photographer Crystal Bear emphasizes:
"Shadows play a big factor in the clarity of your passport photo".
Tips for Taking the Right Photo
Place your camera at eye level, about 4 feet away from where you’re standing. Use a tripod, a stack of books, or ask someone to hold the camera steady. Frame the shot so your head is centered, shoulders are visible, and there’s some space above your head.
Wear medium or dark-colored clothing to stand out against the white background. Avoid wearing white or light-colored outfits that might blend in. Keep your expression neutral - eyes open, mouth closed - and look directly into the camera lens. Finally, check that no shadows appear on your face or the background.
Resizing and Printing Passport Photos at Home
Once you've taken your photo, the next steps are resizing it to 2x2 inches and printing it on photo paper. Thankfully, you can handle this easily with tools already available on your computer or by using a passport photo maker online.
Resizing Your Photo to 2x2 Inches
If you're using Windows, open your photo in Microsoft Paint (pre-installed on most systems). Under the "Home" tab, click "Resize." Start by cropping the image into a square to avoid any distortion during resizing. Then, select "Pixels" and set both the width and height to 600. This ensures a resolution of 300 DPI, which meets passport photo standards.
For Mac users, open the image in Preview. Use the "Markup" toolbar and select "Adjust Size." Set the dimensions to 2x2 inches and make sure to enable the "scale proportionally" option to maintain the correct aspect ratio.
When saving your resized file, confirm that it is 600x600 pixels at 300 DPI. Alternatively, for even sharper clarity, save it at 1200x1200 pixels with a 600 DPI resolution. Once the image is properly sized, you're ready to print it on a 4x6-inch sheet.
Printing 2x2 Photos on 4x6 Paper
After resizing the photo, printing it on 4x6 paper ensures the correct dimensions are preserved. Use glossy or matte photo paper for the best results.
Adjust your printer settings carefully. Choose "Actual Size" or "100% scale", and disable options like "Fit to Page" or "Scale to Fit" - these settings can alter the photo's dimensions. Also, match the printer's media type to your photo paper for optimal sharpness.
Before printing multiple copies, do a test print and measure the photo to confirm it’s exactly 2x2 inches. Set your printer quality to "High" or "Best" for sharp, detailed output. Once printed, let the photos dry completely to avoid smudging. Use a paper trimmer or sharp scissors to cut them cleanly to the required size.
Verifying Photo Quality and Compliance
Once you've printed your photo, it's time to ensure it meets all the necessary standards. A quick check now can save you from potential delays later. Incorrect head size and poor resolution are among the most common reasons the Department of State rejects applications.
Checking Resolution and Print Quality
Begin by examining the printed photo under normal room lighting. The image should be sharp, with natural skin tones, and free from any blur or pixelation. Allow the print to dry completely before checking it.
The background must be plain white or off-white, with no visible shadows. Look for any imperfections like holes, creases, smudges, or other damage.
If you're working with a digital file, you can create a U.S. passport photo online or right-click the image and check its properties. The dimensions should fall between 600x600 and 1200x1200 pixels, with a resolution of at least 300 DPI. These checks are essential and complement the resizing and printing steps mentioned earlier. You can also use the free U.S. Department of State Photo Tool to confirm proper alignment and cropping.
Once the resolution and background are verified, it's time to measure the head size and positioning.
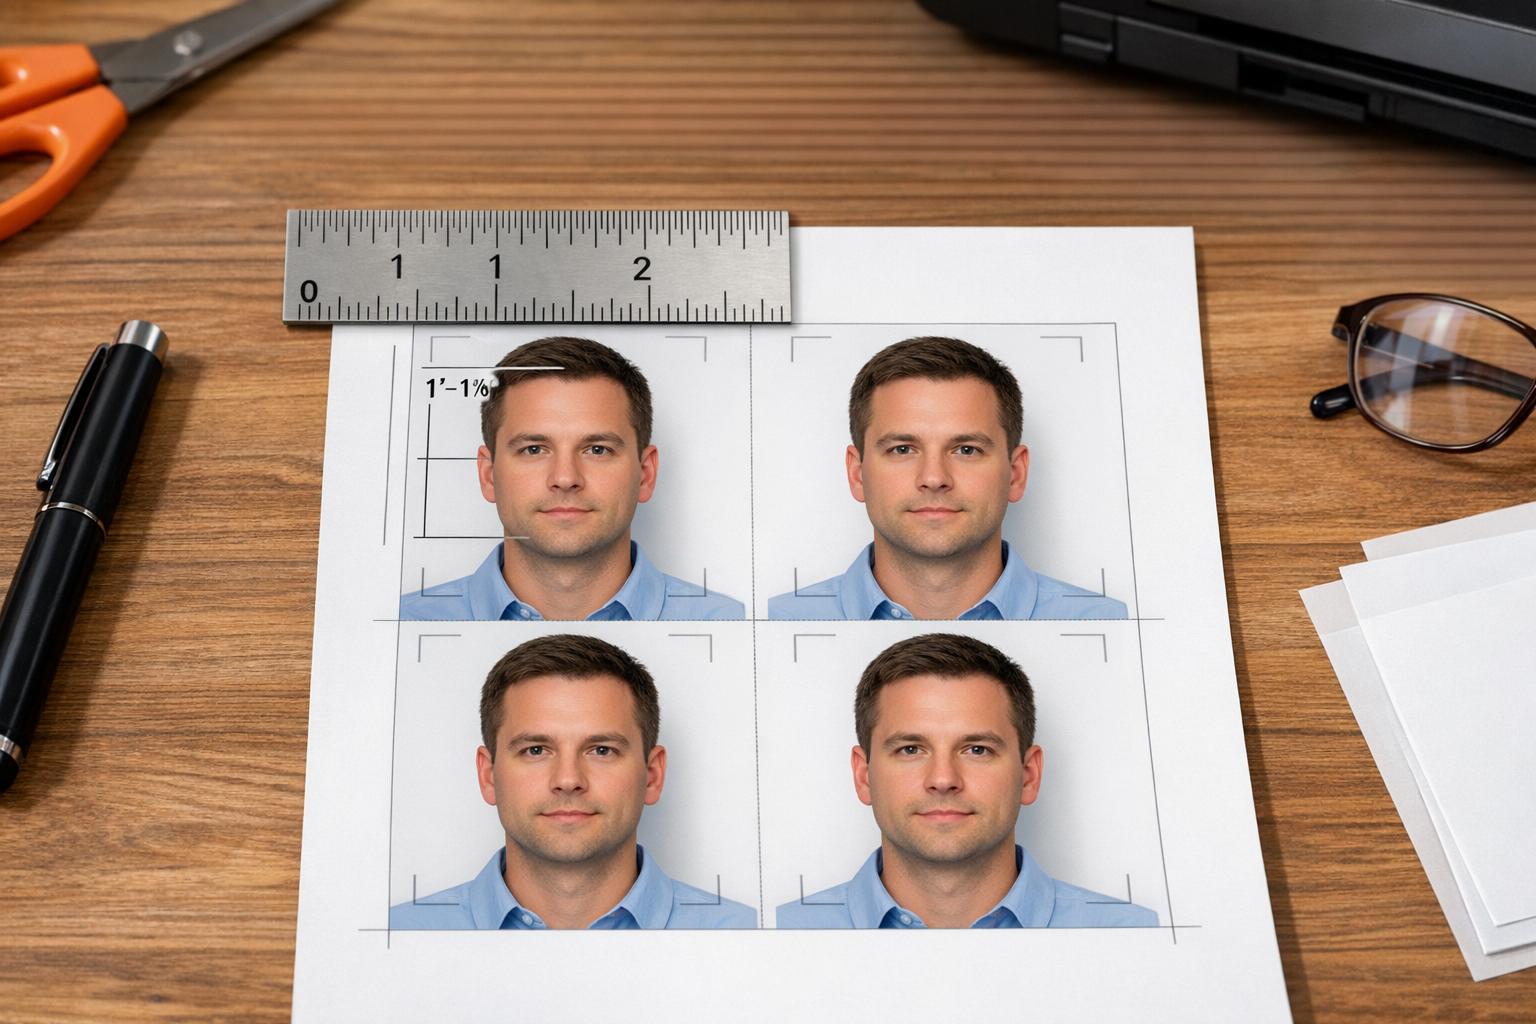
Measuring Head Size and Position
Grab a ruler to measure your printed photo. Start by measuring the distance from the bottom of your chin to the top of your head (including hair). This measurement should fall between 1 inch and 1 3/8 inches.
Next, measure the distance from the bottom edge of the photo to your eye line. Your eyes should be positioned between 1 1/8 inches and 1 3/8 inches from the bottom. Additionally, your head should take up 50% to 69% of the photo's total height. Ensure your head is centered, with equal spacing on both sides, and that you're looking directly at the camera without tilting your head.
| Requirement | Measurement |
|---|---|
| Total Photo Size | 2 x 2 inches (51 x 51 mm) |
| Head Height (Chin to Top of Hair) | 1 to 1 3/8 inches (25 to 35 mm) |
| Eye Height (Bottom of Photo to Eyes) | 1 1/8 to 1 3/8 inches (28 to 35 mm) |
Conclusion
By following the detailed steps for setup, shooting, and printing, creating passport photos at home can be straightforward and stress-free. Meeting U.S. passport photo requirements is achievable with a few key actions: use a plain white background, position your camera at eye level about 4–6 feet away, and ensure the final 2×2-inch print includes proper head measurements. This process takes just a couple of minutes and can save you $15–$25 compared to professional services.
The most important part? Double-check your photo’s resolution (at least 300 DPI) and head alignment before printing. This helps avoid the common issue of photo rejections, which are a leading cause of delays in passport applications.
For added peace of mind, Passport Photo Ready offers expert verification with a 100% compliance guarantee. Starting at $8.99, you’ll get a digital 2×2-inch photo and a 4×6 printable sheet, with an option for Walgreens pickup. Every photo is reviewed to ensure it meets Department of State standards, and if it’s rejected, you’ll get a full refund.
"Taking your own photo at home can be the most convenient and cheapest way, as long as you follow the guidelines." - Quintin Willekens, Program Leader & Sustainability Expert, Rustic Pathways
With the right preparation and tools, you can confidently create high-quality passport photos at home, saving money while getting ready for your next adventure.
FAQs
What printer settings keep the photo exactly 2x2 inches?
To get your passport photo to print perfectly at 2x2 inches, make sure to use these settings:
- Paper Size: Opt for 4x6-inch paper (or a similar size) and ensure no scaling occurs.
- Print Scale: Set it to 100% or choose "Actual Size." Avoid any automatic scaling options.
- DPI: Use a minimum of 300 DPI to maintain clarity and sharpness.
- Printer Settings: Turn off "fit to page" or "scale to fit" features, and ensure the print size remains at 100%.
Can I use a phone selfie, or do I need the rear camera?
When it comes to taking your passport photo, you have two options: snapping a selfie or asking someone else to take it for you. While selfies are super convenient, having someone assist you can make a big difference in terms of lighting, positioning, and capturing the right expression - all of which help ensure your photo meets U.S. passport requirements.
If you go the selfie route, just make sure it checks all the boxes: the photo must be 2 x 2 inches, with the correct head position, a plain background, and high resolution. Using your phone’s rear camera can often give you sharper results, but with the right effort, a selfie can absolutely work.
How do I fix shadows on the background at home?
To minimize shadows in your passport photo, focus on your lighting setup. Position two light sources at a 45-degree angle on either side to create even lighting across your face and background. Alternatively, using natural light from a window directly in front of you can work well. If shadows persist, make sure your background is simple and brightly lit, and adjust the lights to prevent harsh shadows on your face or in the background.