Passport Size Standard: Official U.S. Photo Requirements Explained
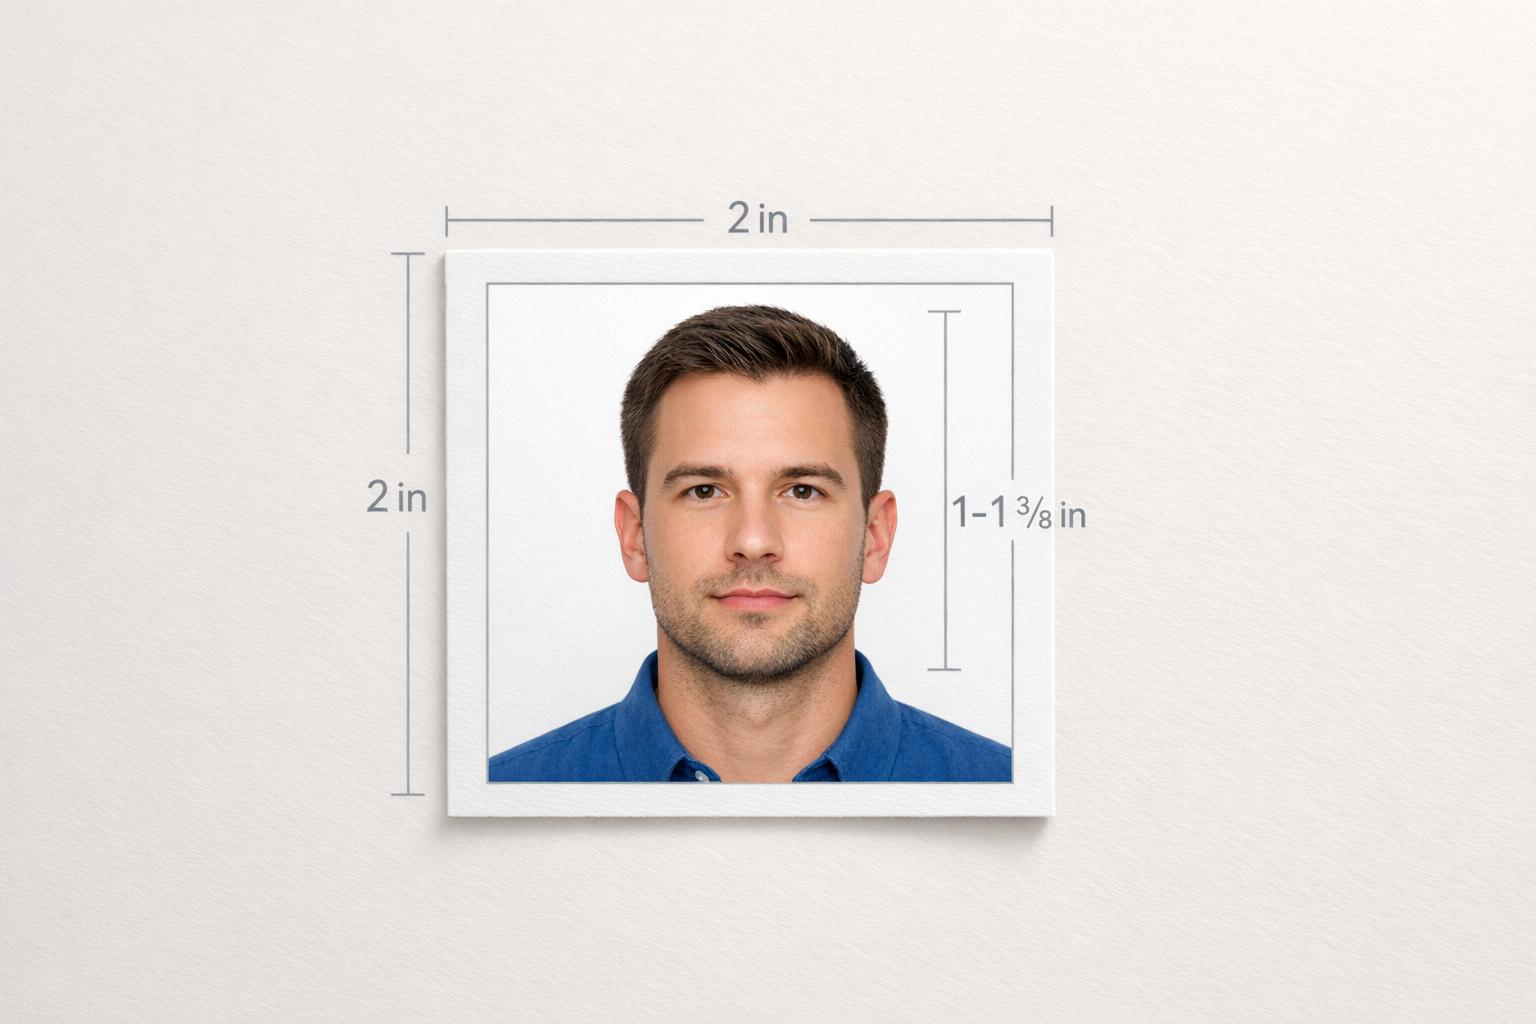
U.S. passport photo rules: 2×2 inches, head 1–1 3/8 in, plain white background, recent, no glasses or edits.
Passport Size Standard: Official U.S. Photo Requirements Explained
Your passport photo must meet strict U.S. Department of State guidelines to avoid delays or rejection. Non-compliant photos are the top reason passport applications are rejected, delaying processing by 2–8 weeks or even causing denial without a refund. Here’s what you need to know:
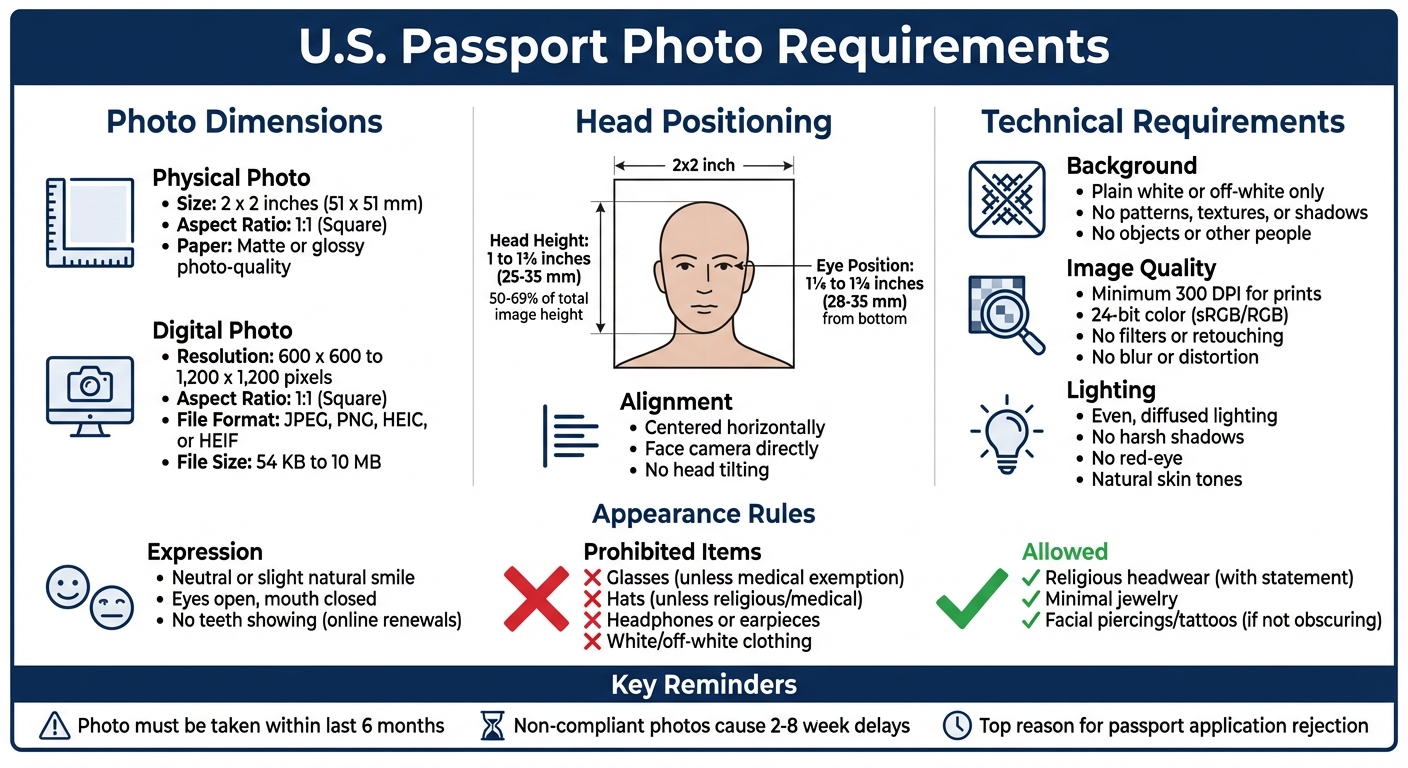
- Size: 2 x 2 inches (51 x 51 mm) with head height between 1–1 3/8 inches (25–35 mm).
- Background: Plain white or off-white, with no shadows or patterns.
- Expression: Neutral or slight natural smile.
- Timeliness: Taken within the last 6 months.
- Glasses: Prohibited unless medically exempt.
- Digital Edits: No filters, retouching, or alterations.
For digital photos, resolution must be 600 x 600 to 1,200 x 1,200 pixels, file size between 54 KB and 10 MB, and saved in JPEG, PNG, HEIC, or HEIF format. Printed versions should use high-quality matte or glossy photo paper.
To ensure compliance, tools like Passport Photo Ready can simplify the process by checking and adjusting your photo automatically. Avoid common passport photo rejection reasons like poor lighting, incorrect cropping, or shadows to ensure your application is accepted. Following these guidelines ensures a smoother application process and avoids unnecessary delays.
U.S. Passport Photo Requirements: Complete Specifications Guide
Photo Size and Layout Requirements
2x2 Inch Dimensions and Aspect Ratio
For passport photos, the dimensions need to be precise. Your photo should have a 1:1 aspect ratio and measure exactly 2 x 2 inches (51 x 51 mm) for printed versions. If you're submitting a digital photo, the resolution must fall between 600 x 600 and 1,200 x 1,200 pixels, with a file size ranging from 54 KB to 10 MB. Accepted file formats include JPEG, PNG, HEIC, or HEIF. Printed photos should be on either matte or glossy photo-quality paper.
| Requirement | Physical Photo | Digital Photo |
|---|---|---|
| Overall Size | 2 x 2 inches (51 x 51 mm) | 600 x 600 to 1,200 x 1,200 pixels |
| Aspect Ratio | 1:1 (Square) | 1:1 (Square) |
| File Format | N/A (Printed on photo paper) | JPEG, PNG, HEIC, or HEIF |
| File Size | N/A | 54 KB to 10 MB |
After ensuring the correct photo size, the next step is to verify that your head is positioned properly within the frame.
Head Size and Position in the Frame
Proper head positioning is just as crucial as getting the photo size right. According to U.S. passport photo requirements, your head height - measured from the bottom of your chin to the top of your head (including hair) - should fall between 1 inch and 1 3/8 inches (25–35 mm). This ensures that your head takes up between 50% and 69% of the total image height.
"The facial image size should be no less than 1" (about 2.54 cm.) and no more than 1 3/8" (about 3.5 cm.), measured from the top of the head (not the hairline or the applicant's hair) to the bottom of the chin (not including facial hair)."
- U.S. Department of State
Your head should be centered horizontally in the photo, and you must face the camera directly, without tilting your head. Vertically, your eyes need to be positioned between 1 1/8 inches and 1 3/8 inches (28–35 mm) from the bottom edge of the photo. Additionally, the bottom of the frame should align with your shoulders.
When taking the picture, stand a few feet away from the camera to avoid lens distortion. If you are taking your passport photo at home, using a tripod can help maintain the correct distance. Close-up selfies can create a fish-eye effect, which might cause your photo to be rejected.
sbb-itb-84f4ca2
10 Passport Photo Mistakes That Will Get You Rejected (And How to Fix Them) #passportphoto
Background, Quality, and Lighting Requirements
Let’s dive into the specifics of what makes a passport photo compliant, focusing on the background, image quality, and lighting guidelines.
Plain White or Off-White Background
The U.S. Department of State mandates that passport photos must have a plain white or off-white background. This background should be completely uniform - no patterns, textures, or designs allowed - to ensure the focus stays solely on your face. Shadows on the background are a common reason photos get rejected. To avoid this, stand a few feet away from the wall or backdrop. If a white wall isn’t available, you can use a white sheet or a large piece of white poster board. For infants, a plain white or off-white sheet or blanket works just as well.
"The ICAO standards and Department requirements are intended to ensure that the photograph adequately identifies the passport bearer and thereby prevents difficulties or delays to the bearer during foreign travels."
- U.S. Department of State, 8 FAM 402.1
Make sure the background is completely free of objects like furniture, decorations, or other people. While other neutral colors might seem acceptable, only white or off-white is allowed.
Now, let’s look at the technical requirements for photo resolution and quality.
Resolution and Image Quality Standards
When it comes to digital photos, they need to be between 600 x 600 and 1,200 x 1,200 pixels, saved in JPEG, PNG, HEIC, or HEIF format, and sized between 54 KB and 10 MB. For printed photos, ensure a high resolution of at least 300 DPI to produce a sharp image free of visible pixels or grain. Photos must also be in 24-bit color (8 bits per channel) using the sRGB or RGB color space.
Blurry images, soft focus, or fisheye distortions are not acceptable. Beauty filters, AI touch-ups, or any form of retouching will also lead to rejection.
To avoid quality issues, set your camera or smartphone to the highest resolution available. Don’t send the photo via text message, as compression can degrade image quality. Similarly, scanning a physical photo to create a digital version often reduces clarity. For printed photos, use professional-quality photo paper, whether matte or glossy, and ensure the photo is free of creases, smudges, or printer streaks.
Finally, let’s address the importance of proper lighting.
Proper Lighting Without Shadows
Even, diffused lighting is essential to ensure your photo accurately captures your skin tone and facial features. Avoid overhead lighting or light sources positioned too far to the side, as they can create shadows that obscure your face or the background, leading to rejection.
"Overhead lighting or lights too far off to the side can cast shadows on your face, obscuring your facial features."
- U.S. Department of State
Natural light near a window is ideal, but avoid direct sunlight. If you’re using a flash, diffuse it with a softbox or even a piece of white paper to prevent red-eye or harsh shadows. If red-eye does occur, don’t try to fix it digitally - retake the photo under better lighting conditions.
"Lighting that is too bright may cause your image to be overexposed, while lighting that is too dim may make it underexposed."
- U.S. Department of State
For infant photos, lay the baby on a plain white sheet and take the picture from above. Make sure no shadows fall on the child. Consistent, diffused lighting is essential to avoid hotspots on the skin or dark shadows in the frame. Following these lighting guidelines ensures your photo meets U.S. passport regulations and ICAO standards.
Facial Expression, Clothing, and Accessory Rules
This section focuses on visible details that help confirm your identity, complementing the technical requirements.
Neutral Expression Requirements
When taking your passport photo, maintain a neutral expression with your eyes open and your mouth closed. A slight, natural smile is fine, but if you're renewing your passport online, avoid showing teeth. Stay away from squinting, exaggerated expressions, or anything that distorts your facial features.
"The applicant's expression should be natural. Normal, unexaggerated smiles are acceptable, but unusual expressions and squinting are not."
- 8 FAM 402.1-5
Position yourself directly facing the camera without tilting your head. Ensure your hair doesn't cover your eyes - they must remain fully visible. For infants, the rules are more flexible; their eyes can be partially or completely closed, as the goal is to capture the best likeness under the circumstances. Now, let’s move on to how your clothing plays a role in creating a clear photo.
What to Wear and What to Avoid
Choose everyday clothing that reflects how you usually appear. Avoid uniforms, camouflage, or attire that suggests ties to military or law enforcement. Also, steer clear of white or off-white clothing, as it can blend into the background.
Opt for solid, darker colors like black, navy, or charcoal to ensure your image stands out. Avoid clothing with high necklines, large collars, or scarves that might obscure your neck or chin. Jewelry should be kept minimal - small studs or simple necklaces are fine, but large, reflective, or dangling pieces that could cast shadows or hide parts of your face should be avoided. Tucking your hair behind your ears is a good way to ensure your entire face is visible.
Glasses, Headwear, and Accessory Restrictions
Glasses are not permitted in passport photos unless you have a medical exemption. Similarly, hats and head coverings are only allowed if they are worn for religious or medical reasons. If you wear religious headwear, you’ll need to submit a signed statement confirming that it’s part of a recognized religious practice and that removing it for the photo would substantially interfere with your religious exercise. The headwear must not cast shadows or conceal any part of your face, from your hairline to your chin.
Electronic devices like headphones or Bluetooth earpieces are strictly prohibited. Facial piercings and tattoos are acceptable as long as they don’t obscure your face or make it difficult to identify you.
How to Create and Submit Your Passport Photo
Now that you know the standards, let’s break down how to take and submit a U.S. passport photo online that meets official requirements. You can either take the photo yourself at home or use an automated service to ensure it’s compliant. Following the right steps can prevent rejections, which could delay your application by 2 to 8 weeks.
Taking a Photo at Home That Meets Requirements
Start by positioning yourself about 2 feet away from a plain white or off-white wall to minimize shadows. For the best lighting, face a window that provides natural, even light, and avoid using overhead lights or flash. Either use a tripod or ask someone to take the picture at eye level from about 5 feet away - selfies won’t work.
Wear dark-colored clothing to stand out against the background, and remove glasses, hats, and other accessories. Make sure your face is clearly in focus before snapping the photo. Save the image as a JPG, PNG, or HEIC file, ensuring the file size is between 54 KB and 10 MB. Avoid any digital editing or retouching, as alterations can lead to rejection.
Using Passport Photo Ready for Hassle-Free Compliance
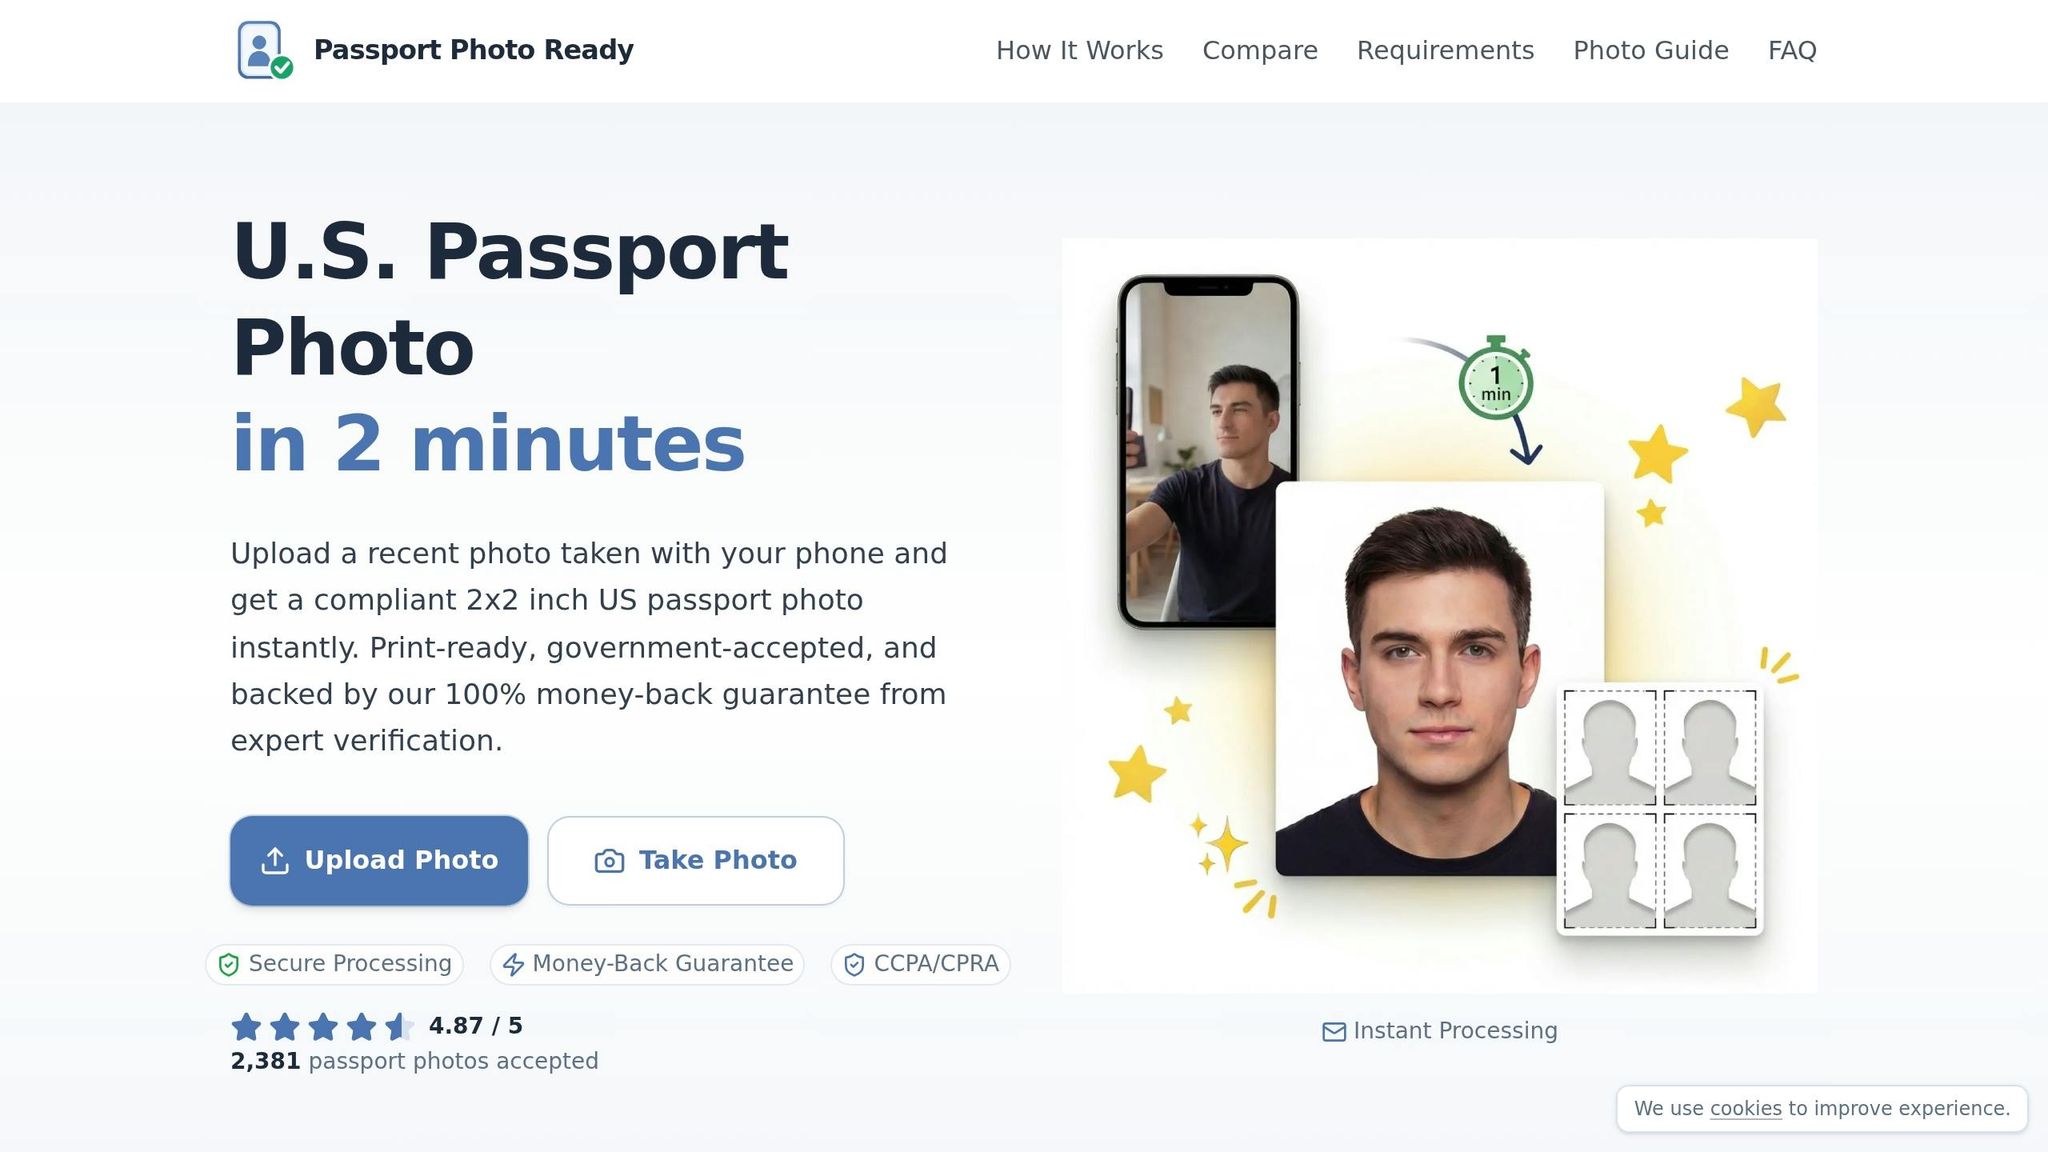
If you’d rather skip the guesswork, upload your photo to Passport Photo Ready. This tool automatically checks for compliance with all U.S. passport standards. It replaces your background with a plain white or off-white one, crops the image to the required 2×2 inch size, and ensures your head height is between 1 and 1 3/8 inches. The tool also adjusts lighting and color balance for natural skin tones. After these automated adjustments, the photo is reviewed by experts. The service guarantees compliance - if your photo is rejected by the State Department, you’re eligible for a full refund or a free replacement.
Once you have a compliant digital photo, you’re ready to move on to submission.
Submitting Your Passport Photo: Digital and Print Options
For online passport renewals through MyTravelGov, upload your digital photo directly to the portal, ensuring it meets the format and size requirements mentioned earlier. For physical applications, print your photo on matte or glossy photo-quality paper at the exact 2×2 inch size. Avoid stapling the photo to your application.
Passport Photo Ready provides a 2×2 digital download and a 4×6 printable sheet. They also offer an option for pickup at Walgreens. Digital files are typically ready within 15 minutes, while printed photos are usually shipped within 24 hours.
Conclusion
Submitting a passport photo that meets every requirement is key to avoiding frustrating delays. As mentioned earlier, non-compliant photos are one of the top reasons applications get rejected, potentially delaying the process by 2 to 8 weeks. To ensure your photo gets approved, it must follow strict guidelines: it should be 2×2 inches, taken within the last 6 months, have a plain white or off-white background, show a neutral expression, and exclude glasses or any digital edits.
Even small mistakes - like shadows in the background, poor lighting, or incorrect cropping - can lead to rejection. The earlier sections outlined the exact specifications, including head size, file dimensions, and resolution, all of which must be carefully met.
This is where Passport Photo Ready simplifies everything. The platform checks over 20 compliance factors automatically, ensuring your photo is properly sized, well-lit, and meets all technical standards. It even offers expert verification and background adjustments, all with a 100% compliance guarantee. If your photo doesn’t pass, you’ll get a full refund.
Whether you’re opting for routine processing (4–6 weeks) or expedited service (2–3 weeks for an extra $60), starting with a compliant photo saves time and hassle. Passport Photo Ready offers passport renewal photo services that meet all requirements, with the option to pick up printed versions conveniently at Walgreens.
FAQs
How do I measure my head size correctly?
To figure out your head size for a U.S. passport photo, grab a ruler or measuring tape. Measure from the bottom of your chin to the top of your head, including any hair that sticks up. Make sure the measurement is straight and precise. According to official guidelines, your head should measure between 1 inch and 1 3/8 inches from chin to crown.
Why are digital edits and filters not allowed?
The use of digital edits and filters is not allowed because they can change or obscure an applicant's actual appearance, which is essential for proper identification and security purposes. The U.S. Department of State mandates that photos must represent your natural look, and any altered photos may not be accepted.
What should I do if my photo gets rejected?
If your passport photo gets rejected, pinpoint the problem - this could be anything from the wrong size or background to poor lighting or an unsuitable facial expression. Fix the issue by making the necessary adjustments, then resubmit a photo that aligns with the official requirements. To avoid further delays, carefully review the guidelines to ensure your updated photo checks all the boxes.